


Multitasking on a laptop can be frustrating when you need to constantly switch between tabs or resize windows. Whether you are working on an assignment while referencing a document, comparing two spreadsheets, or watching a video while browsing online, splitting your laptop screen can help you stay organized and efficient. So, knowing how to split the screen on a laptop is essential for improving productivity.
Splitting the screen on a laptop is very simple. Most modern laptops come with built-in tools that make it easy to view two apps or windows side by side. Once you know the steps, you can split the laptop screen within seconds to increase overall productivity. In this guide, we’ll explore ways to split the screen on a laptop, whether it’s a Windows or Mac and show you how to boost your productivity without the hassle of constantly switching between tabs.
How to Split Screen on a Windows Laptop?
Windows offers multiple ways to make two or more applications open on the screen easily at the same time.
Using Snap Layouts
The simplest and visually guided method of splitting your screen is using the snap layout.
- Start by opening the app or window you want to work with.
- Move your cursor over the square Maximize icon in the top-right corner of the window. Don’t click, hover.
- You’ll see a set of layout options, like split half, thirds, or even four parts. These show how your screen can be divided between apps.
- Click on the section of the layout where you want the current window to be placed. Windows will automatically snap it into position.
- Right after placing the first window, you will be prompted to pick the remaining windows to fill the empty sections. Just click on the ones you want to include.
Using Shortcut Keys
Shortcut keys are often the quicker method of doing activities and not different in splitting the screen as well.
- Open the first window you want to display in a split view.
- Press Windows Key + LeftArrow/ RightArrow to push the displayed window to the side you want.
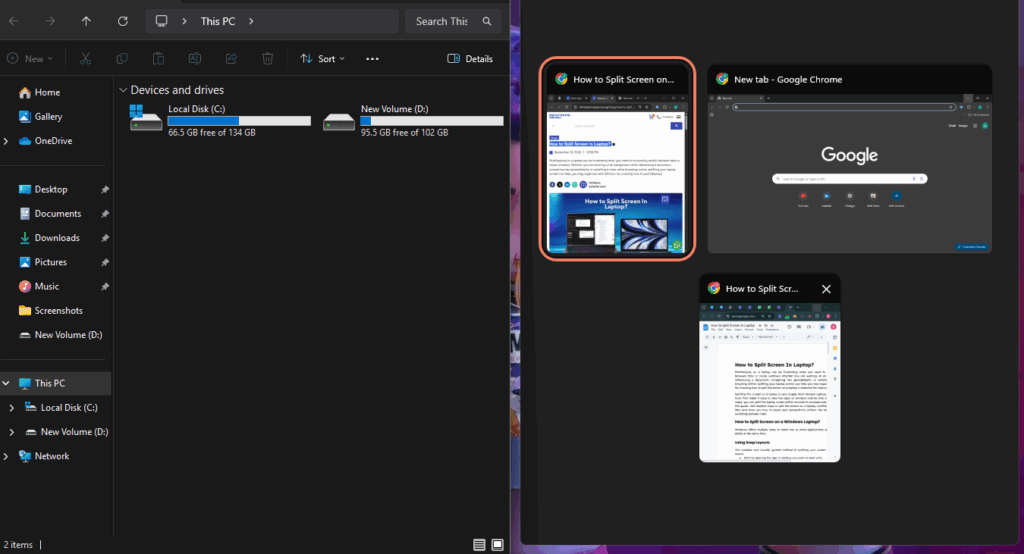
- The other half of the screen will automatically show thumbnails of your open windows.
- Simply click on any of the suggested windows to fill the empty space.
Now you’re in split-screen mode, two apps side by side for smooth multitasking. To terminate the split view, simply press Esc and then press Windows Key+Up Arrow twice to have a full screen view of the window.
With Drag And Drop
To make the windows placed perfectly on the side with a simple movement of the cursor, the drag and drop method is the way.
- Click and hold the title bar of the first window.
- Drag a little bit down, and it will show a small bar at the top of the screen. Don’t release the trackpad.
- Drag it up to the bar; it will give you different split layouts where it can be placed. Move the application window there and release the touchpad.
- Once placed on one side, it will automatically show thumbnails of other apps to fill the other side with, and choose the one.
- Adjust the size by dragging the edges or corners to fit your preference.
Using Third Party Tool
Two columns of windows are not enough for you? Don’t worry, you can have more. PowerToys is a powerful, free tool by Microsoft that lets you divide your screen into multiple sections, offering far more flexibility than the standard Windows split-screen feature.
- Download and install PowerToys from the Microsoft Store.
- Open the app and navigate to Windowing > FancyZones > Launch layout editor.
- A pop-up window will appear with multiple layout templates for splitting your screen into various zones.
- Pick a template you like or create your own custom layout.
- Once your layout appears on the screen, press and hold the Shift key, then drag your application window into any of the available zones.
How to Split Screen on a MacBook?
In the same way as Windows, macOS also provides different ways of splitting the screen for multiple applications, and all the ways are super simple.
Using Snap Layouts
Exactly the same as the windows, you can also divide your MacBook’s screen for multiple applications using the snap layouts.
- Hold the pointer over the green button in the top-left corner of the window.
- Then choose Full Screen > Left of Screen or Right of Screen, whichever side you want to display the window.
- Select your preferred side, and then choose another app for the other half of the screen.
Using Shortcut Keys
If you want to split your Apple MacBook screen without touching the touchpad, then you can do it with the keyboard shortcuts.
Open one of the windows you want to view in a split screen.
Press Command + Left/Right Arrow, depending on which side of the screen you want it to snap to.
Your Mac will show the other open windows, press Tab to switch between them and hit Enter to choose the desired one.
Using Third Party Tools
Mac too lets you use third party tools for making different parts of the screen use for different apps. And the best among them is Rectangle.
- Go to the website and download the setup file.
- Install it by moving it into the Applications folder.
- Once installed, open the app and give it permission to control your windows.
- Now, you can either use keyboard shortcuts or the menu bar icon to snap your windows into place, left half, right half, top left, full screen, or even custom positions.
- Want to split your screen between three or four apps? No problem, drag your windows to the corners or edges, or use shortcut combos to set them instantly.
How to Use Virtual Desktop?
Your screen might not be big enough for viewing the items from multiple windows clearly at once, and you may not like a messy taskbar with so many apps open at once. And constantly switching between them can hurt your focus. But, what if I say, you can have multiple screens within your single laptop? It’s called Virtual Desktop.
In Windows, simply press Windows Key + Tab, it will show the option labelled New Desktop. Just press there and you have a new screen in your laptop where you can organise tasks separately. To switch between them quickly, press Ctrl+Windows Key + Left/Right Arrow.
In Mac, swipe up your trackpad with three fingers, and the thumbnails of open apps will be shown with the Desktop at the top. On the right corner, a (+) icon can be seen to add a new window, which you can organize for a new task.
To use it in the best way, assign each one to a specific task, like study, work, or entertainment. This simple trick helps you stay focused, avoid clutter, and manage multiple workflows with ease. Switching between desktops is quick, letting you move smoothly from one task to another. Plus, it gives you a quick way to hide sensitive or private work when someone unexpectedly walks into your room. It’s a simple yet powerful feature to keep your digital life clean and well-structured.
How to make Split Screen Effective?
Opening multiple apps on a single screen is a great way to boost productivity, but only if it’s done right. It doesn’t always guarantee better multitasking, in fact, if your screen is too small or cluttered, it will hurt your focus. So, to do it in the right way, start by customizing your Snap Layout settings in Windows. Go to Settings > System > Multitasking and fine-tune how windows snap, resize, and suggest layouts. This ensures your workspace adapts to your style of working. Another smart approach is to use virtual desktops, especially if you’re juggling different tasks like research, writing, meetings, or entertainment.
For those who need more than two or three apps open at once, a larger or higher-resolution monitor can significantly improve your workflow. A 24-inch or 27-inch display, or even a 4K or ultrawide monitor, allows more windows to fit without overlapping. You can also connect a second screen for added space. The key is to match your multitasking needs with the right setup, combining virtual desktops, snap layouts, and a suitable screen size. When done correctly, this not only reduces clutter but also enhances your overall experience and productivity.
👉👉👉 Also Read: How to Setup a Dual Monitor?
Conclusion
Splitting your laptop screen is a smart way to improve focus and productivity, especially when working with multiple apps or windows. And it’s super easy too. Both Windows and Mac offer built-in options like Snap Layouts, Split View, and keyboard shortcuts to make multitasking easier. These features allow you to arrange your workspace without needing an extra monitor. For advanced control, additional tools like FancyZones and Rectangle let you create custom layouts and snap windows exactly where you want. You can even combine these tools with virtual desktops for better task separation. Choosing the method that suits your workflow can make your digital workspace cleaner and more efficient. When used right, screen splitting becomes a game-changer in daily productivity.So, if you are any kind of multitasker, try out these methods of splitting the screen, and you will be amazed at how smooth and effortless everything becomes.